我们使用Django作为主要的Web开发框架,并且喜欢简单。
在本文中,我将指导您如何在不安装第三方应用程序的情况下在Django应用程序中启用WebSockets。
Django从3.0版开始引入了ASGI接口,在3.1版中引入了异步视图。 我们的解决方案将基于异步视图。 在本教程中,我们将使用Python 3.7和Django 3.1。
WebSockets ASGI界面简介
ASGI是已经使用了多年的WSGI协议的替代协议,并且将在接下来的2-3年内成为Python Web框架中的事实上的标准。
那么,WebSocket在这种情况下如何工作?让我们找到它!
WebSocket客户端与您的应用程序之间的通信是基于事件的。 ASGI规范定义了两种类型的事件:发送和接收。
接收事件。这些是客户端发送到您的应用程序的事件。让我们看看它们:
当客户端尝试与我们的应用程序建立连接时,发送websocket.connect
当客户端向我们的应用程序发送数据时发送websocket.receive
websocket.disconnect告诉我们客户端已断开连接。
我们的应用程序将发送事件发送到客户端(例如浏览器)。以下是它们的列表:
websocket.accept —如果我们要允许连接,我们会将事件发送回客户端
websocket.send-通过此事件,我们将数据推送到客户端
当我们想要中止连接时,应用程序会发出websocket.close。
现在,我们知道该党的所有参与者,是时候谈论他们的命令了。
当浏览器打开连接时,ASGI协议服务器(我们将在后面讨论)将向我们发送websocket.connect事件。我们的应用程序必须根据我们的逻辑使用websocket.accept或websocket.close对其进行响应。很简单:发出websocket.accept(如果允许连接)或发出websocket.close取消连接。例如,如果用户没有连接权限或未登录,则可能要取消连接。我将假设您在接下来的步骤中允许连接。
接受连接后,应用程序即可使用websocket.send和websocket.receive事件通过该套接字发送和接收数据。
最后,当浏览器离开页面或刷新页面时,会将websocket.disconnect发送到应用程序。作为开发人员,您仍然可以控制连接,并且可以随时通过发送websocket.close事件来中止连接。
这是ASGI如何处理WebSocket的简要说明。它不限于Django,它适用于其他任何与ASGI兼容的Web框架,例如Starlette或FastAPI。
设置Django应用
在本教程中,我将不涉及Django安装和设置主题。 另外,我假设您已经安装并正在运行Django。
首先,我们必须创建一个新的Django应用程序。 该应用程序将保留自定义URL模式功能,ASGI中间件和WebSocket连接类。
让我们使用以下命令创建一个新应用:
|
1 |
django-admin startapp websocket |
好的,现在让我们创建一个新的小助手功能,以方便开发人员。 目前,此功能将是路径功能的简单别名。
使用以下内容将urls.py添加到websocket应用程序:
|
1 2 |
from django.urls import path websocket = path |
现在,您可以以不同的方式配置WebSocket URL。 是时候创建您的第一个WebSocket视图了! 为了使事情简单易用,我们将制作另一个名为`users’的Django应用。 不要忘记在INSTALLED_APPS设置中启用这两个应用程序!
|
1 |
django-admin startapp users |
实施ASGI中间件
中间件将是我们在WebSocket和Django提供的异步视图之间的粘合代码。 中间件将拦截WebSocket请求,并将其与Django默认请求处理程序分开分发。 创建新的Django项目时,已安装的项目已将名为asgi.py的新文件添加到项目安装目录。 您将在其中找到ASGI应用程序。 这是我们将要使用的应用程序,而不是已定义的inwsgi.py。
创建一个新的websocket / middleware.py文件,并将代码放入其中:
|
1 2 3 4 5 6 7 8 9 10 11 |
from django.urls import resolve from .connection import WebSocket def websockets(app): async def asgi(scope, receive, send): if scope["type"] == "websocket": match = resolve(scope["raw_path"]) await match.func(WebSocket(scope, receive, send), *match.args, **match.kwargs) return await app(scope, receive, send) return asgi |
每个ASGI中间件都是可调用的,可以接受另一个可调用的。 在中间件中,我们测试请求类型是否为websocket,如果是,则为可调度视图函数调用Django的URL解析器。 顺便说一句,如果解析器找不到与URL匹配的视图,将引发404错误。
现在,打开project_name / asgi.py文件,并使用以下中间件包装默认应用程序:
|
1 2 3 4 |
from django.core.asgi import get_asgi_application from websocket.middleware import websockets application = get_asgi_application() application = websockets(application) |
从那一刻起,我们的中间件将捕获每个发出的请求,并对其类型进行测试。 如果类型是websocket,则中间件将尝试解析并调用视图函数。
此刻,您不必介意从.connection模块中丢失导入。 我们将在一分钟内完成。
添加WebSocket连接
WebSocket连接的角色类似于您在视图中使用的请求对象。 该连接将封装请求信息以及有助于您接收和发送数据的方法。 该连接将作为WebSocket视图函数的第一个参数传递。
使用下面要点中的内容创建websocket / connection.py。 为了简化生活,我们还将枚举类中所有可能的WebSocket事件,添加Headers类以访问请求标头,并添加QueryParams从查询字符串中获取变量。
|
1 2 3 4 5 6 7 8 9 10 11 12 13 14 15 16 17 18 19 20 21 22 23 24 25 26 27 28 29 30 31 32 33 34 35 36 37 38 39 40 41 42 43 44 45 46 47 48 49 50 51 52 53 54 55 56 57 58 59 60 61 62 63 64 65 66 67 68 69 70 71 72 73 74 75 76 77 78 79 80 81 82 83 84 85 86 87 88 89 90 91 92 93 94 95 96 97 98 99 100 101 102 103 104 105 106 107 108 109 110 111 112 113 114 115 116 117 118 119 120 121 122 123 124 125 126 127 128 129 130 131 132 133 134 135 136 137 138 139 140 141 142 143 144 145 146 147 148 149 150 151 152 153 154 155 156 157 158 159 160 161 162 163 164 165 166 167 168 169 170 171 172 173 174 175 176 177 178 179 180 181 182 183 184 185 186 187 188 189 190 191 192 193 194 195 196 197 198 199 200 201 202 203 204 205 206 207 208 |
import json import typing as t from urllib import parse class State: CONNECTING = 1 CONNECTED = 2 DISCONNECTED = 3 class SendEvent: """Lists events that application can send. ACCEPT - Sent by the application when it wishes to accept an incoming connection. SEND - Sent by the application to send a data message to the client. CLOSE - Sent by the application to tell the server to close the connection. If this is sent before the socket is accepted, the server must close the connection with a HTTP 403 error code (Forbidden), and not complete the WebSocket handshake; this may present on some browsers as a different WebSocket error code (such as 1006, Abnormal Closure). """ ACCEPT = "websocket.accept" SEND = "websocket.send" CLOSE = "websocket.close" class ReceiveEvent: """Enumerates events that application can receive from protocol server. CONNECT - Sent to the application when the client initially opens a connection and is about to finish the WebSocket handshake. This message must be responded to with either an Accept message or a Close message before the socket will pass websocket.receive messages. RECEIVE - Sent to the application when a data message is received from the client. DISCONNECT - Sent to the application when either connection to the client is lost, either from the client closing the connection, the server closing the connection, or loss of the socket. """ CONNECT = "websocket.connect" RECEIVE = "websocket.receive" DISCONNECT = "websocket.disconnect" class Headers: def __init__(self, scope): self._scope = scope def keys(self): return [header[0].decode() for header in self._scope["headers"]] def as_dict(self) -> dict: return {h[0].decode(): h[1].decode() for h in self._scope["headers"]} def __getitem__(self, item: str) -> str: return self.as_dict()[item.lower()] def __repr__(self) -> str: return str(dict(self)) class QueryParams: def __init__(self, query_string: str): self._dict = dict(parse.parse_qsl(query_string)) def keys(self): return self._dict.keys() def get(self, item, default=None): return self._dict.get(item, default) def __getitem__(self, item: str): return self._dict[item] def __repr__(self) -> str: return str(dict(self)) class WebSocket: def __init__(self, scope, receive, send): self._scope = scope self._receive = receive self._send = send self._client_state = State.CONNECTING self._app_state = State.CONNECTING @property def headers(self): return Headers(self._scope) @property def scheme(self): return self._scope["scheme"] @property def path(self): return self._scope["path"] @property def query_params(self): return QueryParams(self._scope["query_string"].decode()) @property def query_string(self) -> str: return self._scope["query_string"] @property def scope(self): return self._scope async def accept(self, subprotocol: str = None): """Accept connection. :param subprotocol: The subprotocol the server wishes to accept. :type subprotocol: str, optional """ if self._client_state == State.CONNECTING: await self.receive() await self.send({"type": SendEvent.ACCEPT, "subprotocol": subprotocol}) async def close(self, code: int = 1000): await self.send({"type": SendEvent.CLOSE, "code": code}) async def send(self, message: t.Mapping): if self._app_state == State.DISCONNECTED: raise RuntimeError("WebSocket is disconnected.") if self._app_state == State.CONNECTING: assert message["type"] in {SendEvent.ACCEPT, SendEvent.CLOSE}, ( 'Could not write event "%s" into socket in connecting state.' % message["type"] ) if message["type"] == SendEvent.CLOSE: self._app_state = State.DISCONNECTED else: self._app_state = State.CONNECTED elif self._app_state == State.CONNECTED: assert message["type"] in {SendEvent.SEND, SendEvent.CLOSE}, ( 'Connected socket can send "%s" and "%s" events, not "%s"' % (SendEvent.SEND, SendEvent.CLOSE, message["type"]) ) if message["type"] == SendEvent.CLOSE: self._app_state = State.DISCONNECTED await self._send(message) async def receive(self): if self._client_state == State.DISCONNECTED: raise RuntimeError("WebSocket is disconnected.") message = await self._receive() if self._client_state == State.CONNECTING: assert message["type"] == ReceiveEvent.CONNECT, ( 'WebSocket is in connecting state but received "%s" event' % message["type"] ) self._client_state = State.CONNECTED elif self._client_state == State.CONNECTED: assert message["type"] in {ReceiveEvent.RECEIVE, ReceiveEvent.DISCONNECT}, ( 'WebSocket is connected but received invalid event "%s".' % message["type"] ) if message["type"] == ReceiveEvent.DISCONNECT: self._client_state = State.DISCONNECTED return message async def receive_json(self) -> t.Any: message = await self.receive() self._test_if_can_receive(message) return json.loads(message["text"]) async def receive_jsonb(self) -> t.Any: message = await self.receive() self._test_if_can_receive(message) return json.loads(message["bytes"].decode()) async def receive_text(self) -> str: message = await self.receive() self._test_if_can_receive(message) return message["text"] async def receive_bytes(self) -> bytes: message = await self.receive() self._test_if_can_receive(message) return message["bytes"] async def send_json(self, data: t.Any, **dump_kwargs): data = json.dumps(data, **dump_kwargs) await self.send({"type": SendEvent.SEND, "text": data}) async def send_jsonb(self, data: t.Any, **dump_kwargs): data = json.dumps(data, **dump_kwargs) await self.send({"type": SendEvent.SEND, "bytes": data.encode()}) async def send_text(self, text: str): await self.send({"type": SendEvent.SEND, "text": text}) async def send_bytes(self, text: t.Union[str, bytes]): if isinstance(text, str): text = text.encode() await self.send({"type": SendEvent.SEND, "bytes": text}) def _test_if_can_receive(self, message: t.Mapping): assert message["type"] == ReceiveEvent.RECEIVE, ( 'Invalid message type "%s". Was connection accepted?' % message["type"] |
添加您的第一个WebSocket视图
我们的项目设置为处理WebSocket连接。 剩下的唯一内容是WebSocket视图功能。 我们还需要一个模板视图来提供HTML页面。
|
1 2 3 4 5 6 7 8 |
# users/views.py from django.views.generic.base import TemplateView class IndexView(TemplateView): template_name = "index.html" async def websocket_view(socket): await socket.accept() await socket.send_text('hello') await socket.close() |
将两个视图安装在根urls.py中
|
1 2 3 4 5 6 7 8 |
# project_name/urls.py from django.urls import path from websocket.urls import websocket from users import views urlpatterns = [ path("", views.IndexView.as_view()), websocket("ws/", views.websocket_view), ] |
users / templates / index.html应该包含以下脚本:
|
1 2 3 |
<script> new WebSocket('ws://localhost:8000/ws/'); </script> |
这是建立WebSocket连接的最低要求。
启动开发服务器
在撰写本文时,Django的runserver命令未使用asgi.py中定义的应用程序。 我们需要使用第三方应用服务器。 我将使用Uvicorn。
|
1 |
pip install uvicorn |
安装完成后,启动传递ASGI应用程序的服务器作为第一个位置参数:
|
1 |
uvicorn project_name.asgi:application --reload --debug |
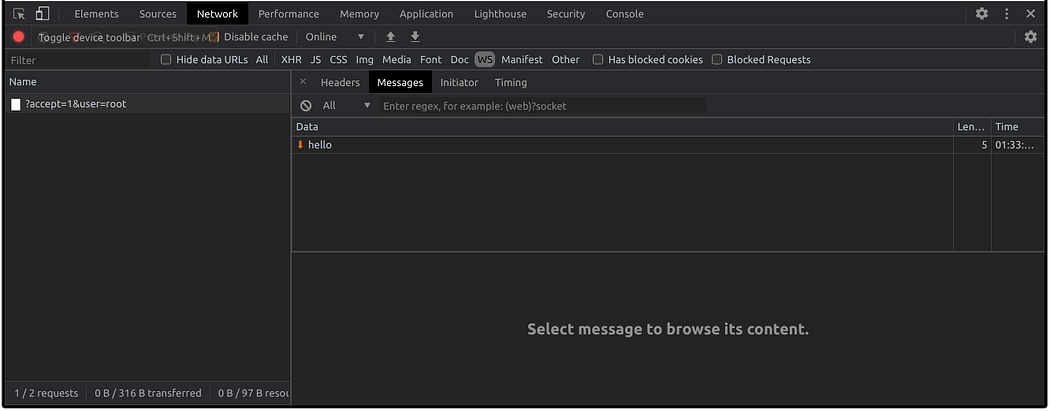
导航到http:// localhost:8000 / test /,打开浏览器的控制台,切换到“网络”选项卡,观察WebSockets的工作情况。
https://miro.medium.com/max/1050/1*eeluHTKFw_zaWWeDsp3ocg.png
回显服务器
我们创建的WebSocket视图是没有用的。 它发送一条消息,然后关闭连接。 我们将在一个简单的回显服务器中重构它,该服务器使用传入的消息文本来回复客户端。
用以下代码替换users / views.py中的websocket_view:
|
1 2 3 4 5 |
async def websocket_view(socket: WebSocket): await socket.accept() while True: message = await socket.receive_text() await socket.send_text(message) |
并使用以下内容替换users / templates / index.html的内容:
|
1 2 3 4 5 6 7 8 9 10 11 12 |
<script> let socket = new WebSocket('ws://localhost:8000/ws/'); let timer = null; socket.onopen = () => { timer = setInterval(() => { socket.send('hello'); }, 1000); }; socket.onclose = socket.onerror = () => { clearInterval(timer); }; </script> |
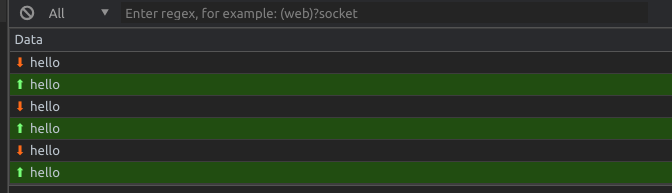
更新的代码将每隔一秒钟将问候文本发送到我们的应用程序,我们的应用程序将以相同的消息对其进行响应。
https://miro.medium.com/max/1008/1*oB2G0xjmGr2szVPmGfp91Q.png
结论
在本文中,我演示了如何仅使用Django 3.1和标准python库将WebSocket支持添加到Django项目中。 是的,我知道仍然需要安装Uvicorn,但这是目前Django开发服务器的限制。
原文:https://medium.com/@alex.oleshkevich/websockets-in-django-3-1-73de70c5c1ba