这篇介绍mongodb和Python使用, 从基本的安装说起,先熟练mongodb的基本操作,然后通过python实现数据插入、查询,以及mongoengine使用,最后是图形化界面连接mongodb数据库,我们从安装开始:
Mongodb 安装
wget https://fastdl.mongodb.org/linux/mongodb-linux-x86_64-rhel62-3.6.4.tgz
tar -zxvf mongodb-linux-x86_64-rhel62-3.6.4.tgz
mv mongodb-linux-x86_64-rhel62-3.6.4 /usr/local/mongodb
添加环境变量:/etc/profille
MONGODB=/usr/local/mongodb
PATH=$MONGODB/bin:$PATH
export PATH
配置文件:
Vi /etc/mongod.conf
|
1 2 3 4 5 6 7 8 9 10 11 12 13 14 15 16 17 18 19 20 21 22 23 24 25 26 27 28 29 30 31 32 33 34 35 36 37 38 39 40 41 42 43 44 45 46 47 48 49 50 51 52 53 54 55 56 57 58 59 60 61 62 63 64 65 66 67 68 69 70 71 72 73 74 |
# mongod.conf # for documentation of all options, see: # http://docs.mongodb.org/manual/reference/configuration-options/ # where to write logging data. systemLog: destination: file logAppend: true path: /var/log/mongodb/mongod.log # Where and how to store data. storage: dbPath: /var/lib/mongo journal: enabled: true # engine: # mmapv1: # wiredTiger: # how the process runs processManagement: fork: true # fork and run in background pidFilePath: /var/run/mongodb/mongod.pid # location of pidfile timeZoneInfo: /usr/share/zoneinfo # network interfaces net: port: 27017 bindIp: 127.0.0.1,192.168.137.131 # Listen to local interface only, comment to listen on all interfaces. #security: #operationProfiling: #replication: #sharding: ## Enterprise-Only Options #auditLog: #snmp: |
启动:
mkdir -p /data/db
mongod &
关闭:
mongod –shutdown –dbpath /data/db
登录数据库关闭:
Mongo //进入客户端
use admin;
db.shutdownServer();
#python升级后pip不能使用,重新安装,你如果pip没问题,不用操作这些步骤。
curl https://bootstrap.pypa.io/get-pip.py -o get-pip.py
python get-pip.py
python -m pip install pymongo
以下是python和mango 的一些脚本程序:
脚本1:插入数据
|
1 2 3 4 5 6 7 8 9 10 11 12 13 14 15 16 17 18 19 20 21 22 23 24 25 26 27 28 29 |
#!/usr/bin/env python #coding=utf-8 import datetime import pprint from pymongo import MongoClient client = MongoClient() db = client.blog post = {"author": "Maxsu", "text": "My first blog post!", "tags": ["mongodb", "python", "pymongo"], "date": datetime.datetime.utcnow()} posts = db.posts post_id = posts.insert_one(post).inserted_id #print ("post id is ", post_id) pprint.pprint(posts.find_one()) |
脚本2:
|
1 2 3 4 5 6 7 8 9 10 11 12 13 14 15 16 17 18 19 20 21 22 23 24 25 26 27 28 29 |
#!/usr/bin/env python #coding=utf-8 import datetime import pprint from pymongo import MongoClient client = MongoClient() db = client.pythondb post = {"author": "Minsu", "text": "This blog post belong to Minsu!", "tags": ["MySQL", "Oracle", "pymongo"], "date": datetime.datetime.utcnow()} posts = db.posts post_id = posts.insert_one(post).inserted_id post = posts.find_one({"author": "Maxsu"}) pprint.pprint(post) |
#脚本3:多查询
|
1 2 3 4 5 6 7 8 9 10 11 12 13 14 15 16 17 18 19 20 21 22 23 24 25 26 27 28 29 30 31 32 33 34 35 36 37 38 39 |
#!/usr/bin/env python #coding=utf-8 import datetime import pprint from pymongo import MongoClient client = MongoClient() db = client.pythondb posts = db.posts for post in posts.find(): pprint.pprint(post) #查询count数量 #coding=utf-8 import datetime import pprint from pymongo import MongoClient client = MongoClient() db = client.pythondb posts = db.posts print("posts count is = ", posts.count()) print("posts's author is Maxsu count is =", posts.find({"author": "Maxsu"}).count()) |
#脚本4:插入一个对象
|
1 2 3 4 5 6 7 8 9 10 11 12 13 14 15 16 17 18 19 20 21 22 23 24 25 26 27 28 29 30 31 32 33 |
#coding=utf-8 import datetime import pprint from pymongo import MongoClient client = MongoClient() db = client.pythondb post = {"_id": 100, "author": "Kuber", "text": "This is is my first post!", "tags": ["Docker", "Shell", "pymongo"], "date": datetime.datetime.utcnow()} posts = db.posts post_id = posts.insert_one(post).inserted_id print("post_id is :", post_id) post = posts.find_one({"_id": post_id}) print("Find By Post ID:") pprint.pprint(post) |
#脚本5:多对象插入
|
1 2 3 4 5 6 7 8 9 10 11 12 13 14 15 16 17 18 19 20 21 22 23 24 25 26 27 28 29 30 31 32 33 34 35 36 37 |
#!/usr/bin/env python #coding=utf-8 import datetime import pprint from pymongo import MongoClient client = MongoClient() db = client.pythondb new_posts = [{"_id": 1000, "author": "Curry", "text": "Another post!", "tags": ["bulk", "insert"], "date": datetime.datetime(2017, 11, 12, 11, 14)}, {"_id": 1001,"author": "Maxsu", "title": "MongoDB is fun", "text": "and pretty easy too!", "date": datetime.datetime(2019, 11, 10, 10, 45)}] posts = db.posts result = posts.insert_many(new_posts) print("Bulk Inserts Result is :", result.inserted_ids) |
以下是mongoengine使用,这个可能之前有人没接触过,你可以理解为类似django中的orm的使用,就是可以通过定义class 来定义数据库表和字段,使用也不复杂,它提供了很多方法供我们使用,官网参考:http://docs.mongoengine.org/
# mongoengine使用:
pip install -U mongoengine
脚本6:
|
1 2 3 4 5 6 7 8 9 10 11 12 13 14 15 16 17 18 19 20 21 22 23 24 25 26 27 28 29 30 31 32 33 34 35 36 37 38 39 40 41 42 43 44 45 46 47 48 49 |
from mongoengine import * connect('test', host='localhost', port=27017) #import datetime from datetime import datetime class Users(Document): name = StringField(required=True, max_length=200) age = IntField(required=True) class Categories(Document): name = StringField(max_length=30, required=True) artnum = IntField(default=0, required=True) date = DateTimeField(default=datetime.now(), required=True) class Posts(Document): title = StringField(max_length=100, required=True) content = StringField(required=True) tags = ListField(StringField(max_length=20, required=True), required=True) categories = ReferenceField(Categories) user1 = Users( name='zz', age= 11 ) user1.save() print(user1.name) user1.name = 'zz11' user1.save() print(user1.name) |
#脚本7 get user
|
1 2 3 4 5 6 7 8 9 10 11 12 13 14 15 16 17 18 19 20 21 22 23 |
users = Users.objects.all() for u in users: print("name:",u.name,",age:", u.age) cate =Categories(name="Linux") cate.save() post = Posts(title="Linuxzen.com", content="Linuxzen.com",tags=["Linux","web"], categories=cate) post.save() cate = Posts.objects.all().first().categories print cate print cate.name cate = Categories.objects(name="Linux").first() print Posts.objects(categories=cate).next |
官网参考:http://docs.mongoengine.org/
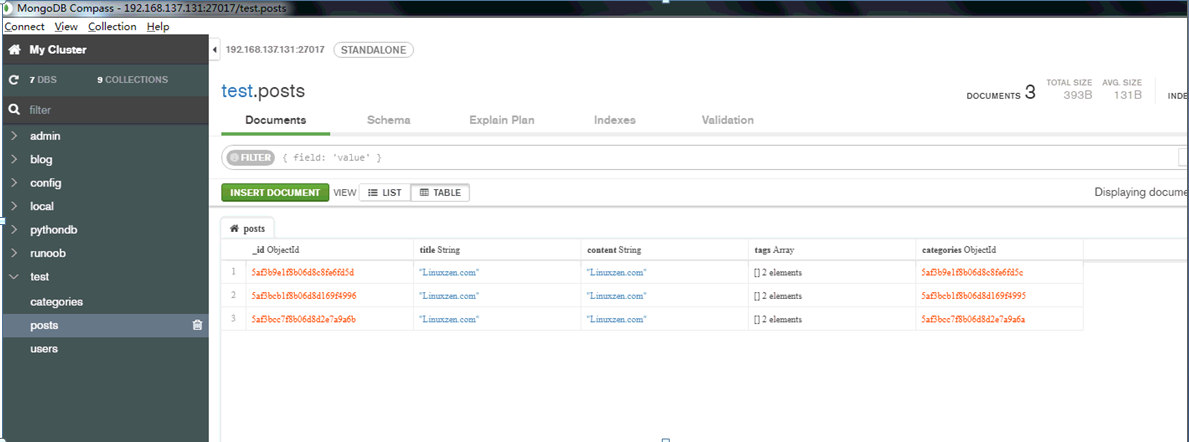
操作mongo数据库用图形化还是很直观,我推荐用官网的Mongodb-compas:
图形化客户端连接:
Mongodb-compas下载
https://www.mongodb.com/download-center?jmp=hero#compass
下载安装: